By pointing a browser at the relevant URL, an IDE (Integrated Development Environment) is rendered which allows you to view the API schema, construct a GraphQL query, run it, and view the results. Essentially an HTTP GET to the API endpoint will render the user interface.
When you first connect to the API with a browser you will probably get a pop-up asking whether you want to "Create a Document" or "Browse Schema". If you just want to see the GraphQL schema (i.e.: see the queries and mutations, what filters can be applied and what results can be returned) then click on Browse Schema. If you want to generate an authentication token or run a query/mutation then click on Create a Document.
Note that you can browse the schema without needing to provide an authentication token.
Browsing the Schema
By clicking Browse Schema on the initial pop-up dialog or by clicking on Schema Reference at the top of the screen you can get to the Schema Reference page. This allows you to interactively browse the schema.
There are two ways of viewing the schema - Type View and Column View. You can toggle between these two views by clicking on the appropriate button at the top of the left hand panel:

The left hand button (the book icon) switches to Type View. The right hand button switches to Column View.
Type View
Type View starts with all the top level query objects along with a description of the parameters you can supply and the fields that can be returned. Each parameter and field is hyperlinked so that clicking on it will open a new page with more details.
Down the right hand side of the browser window you will see a panel containing a list of Types broken down into Queries/Mutations and then the different field types (Objects, Scalars enums etc). You can click on any of these to see all the fields that are available of that type. These will be listed in the left hand panel. Anything hyperlinked in the left hand panel can be clicked on to switch the view to details of the selected object.
To go back to the list of objects, click on the back button at the top of the right hand panel:

Column View
Toggling to column view shows each selected object in a new column. When you click on a hyperlinked entry in a column, a new column opens to the right of it containing details of the selected entry.
In column view, the right hand panel shows the Arguments and return objects for the selected entry (for queries/mutations) or just the object/scalars that make up the field.
Executing a Query
The GraphQL IDE allows you to build a query interactively, to execute it and to view the results, all without writing a single line of code. This allows you to get the query up and running quickly before committing it to code.
To execute a query click on the Operations tab.
Note: The process for executing a mutation is identical but in this section we will just concentrate on running a query.
The IDE will assist you in writing a GraphQL query by offering drop-downs as you type.These drop-downs are context sensitive and will only show the objects that are valid at that point in the query.
For example, as you type the "q" of query a drop-down appears showing "query". You can just hit ENTER to auto-complete or click on the field to select it:

When you get to a place in the query where an object or field needs to be specified you can hit SPACE to get a drop-down list of everything that is valid at that point.
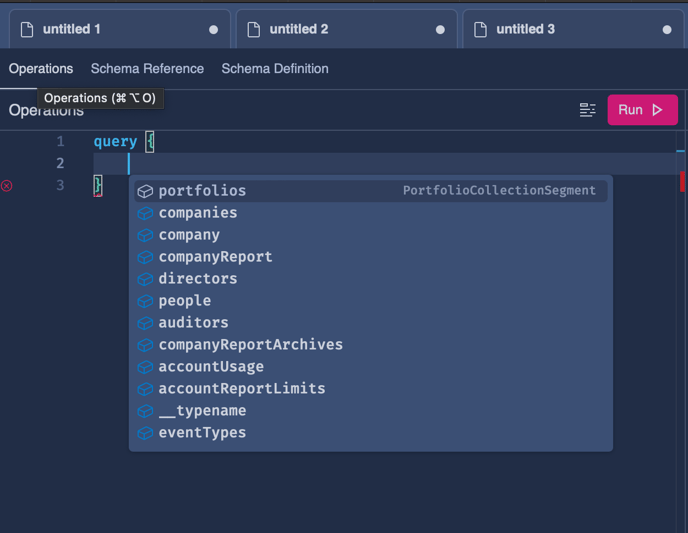
As you start to type, the list reduces to those that match what you've typed:

Here is an example of a completed query.
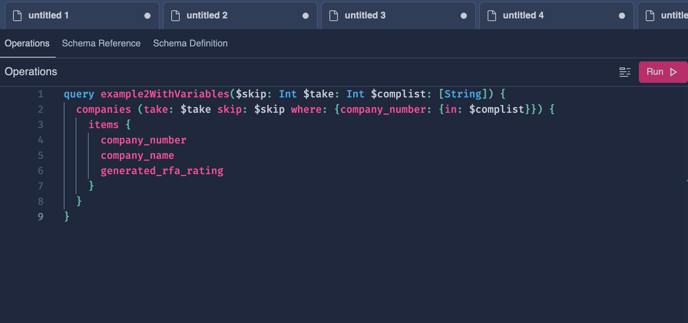
Note: This query contains variables that will need to be supplied. See Using Variables in GraphQL for more information on variables.
Once you've built your query, you're ready to run it.
As described in Getting a Bearer Token, to run any query or mutation you will need to supply an authentication token. The easiest way to add this in the IDE is to select “HTTP Headers” at the bottom of the screen, select the Key “Authorization” from the drop-down, and then for the “Value” enter “Bearer” a space and then the authentication token.
Here is an example of using an access token in the IDE:

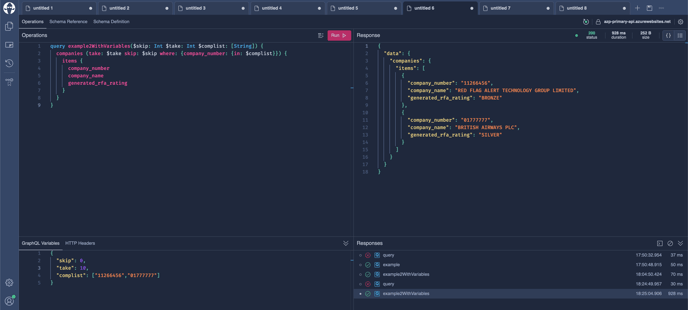
To supply the variables that the query requires, click on GraphQL Variables and add the variables in JSON format:

Once the authentication token and variables have been specified you click the Run button at the top right of the left hand panel.This will encode the query and any associated variables into JSON format (as described in Accessing the GraphQL Programmatically) and POST it to the API endpoint. The results will then be rendered in the right hand Response panel:
If you have any further questions, please reach out to our Support Team via Contact Us.